

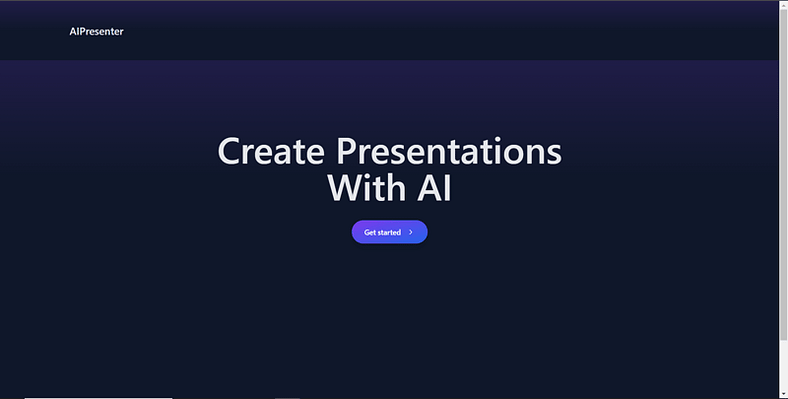
How to build: an AI-powered PowerPoint generator (Next.js, OpenAI, CopilotKit)


TL;DR
In this article, you will learn how to build an AI-powered PowerPoint application using Nextjs, CopilotKit & OpenAI. We will cover:
Leveraging ChatGPT to create your PowerPoint presentation📊
Chatting with your PowerPoint presentation💬
Adding audio and images to your PowerPoint presentation🔉
CopilotKit: Build deeply integrated in-app AI chatbots 💬
CopilotKit is an open-source AI copilot platform. We make it easy to integrate powerful AI chatbots into your React apps. Fully customizable and deeply integrated.
Now back to the article.
Prerequisites
To get started with this tutorial, you need the following installed on your computer:
A text editor (e.g., Visual Studio Code)
Node.js
A package manager
Creating The PowerPoint Application Frontend With NextJS
Step 1: Git clone the PowerPoint application boilerplate using the command below.
git clone https://github.com/TheGreatBonnie/aipoweredpowerpointpresentation
Step 2: Open the PowerPoint application boilerplate on a text editor and install all project dependencies using the command below.
npm install
Step 3: • Go to the root directory and create a file called .env.local. In the file, add the environment variable below that holds your ChatGPT API key.
OPENAI_API_KEY="Your ChatGPT API Key”
Step 4: Run the command npm run dev on the command line. Navigate to http://localhost:3000/, and you should see the PowerPoint application frontend.
Creating PowerPoint Slides Functionality
Step 1: Go to /[root]/src/app/components, and create a file called present.tsx. Then import the following dependencies at the top of the file.
"use client";

import { useCopilotContext } from "@copilotkit/react-core";
import { CopilotTask } from "@copilotkit/react-core";
import {
  useMakeCopilotActionable,
  useMakeCopilotReadable,
} from "@copilotkit/react-core";
import { useEffect, useState } from "react";
import "./../presentation/styles.css";
import Markdown from "react-markdown";
Step 2: Define a TypeScript interface called Slide with properties title and content for a PowerPoint presentation slide.
// Define slide interface
interface Slide {
  title: string;
  content: string;
}
Step 3: Create a function called Presentation and initialize state variables called allSlides and currentSlideIndex with usestate. Variable allSlides will hold an array of slides while currentSlideIndex will hold the current slide index.
export function Presentation (){
  const [allSlides, setAllSlides] = useState<Slide[]>([]);
  const [currentSlideIndex, setCurrentSlideIndex] = useState<number>(0);
}
Step 4: Inside the Presentation function, use the useMakeCopilotReadable hook to add the allSlides array of slides as context for the in-app chatbot.
useMakeCopilotReadable("Powerpoint presentation slides: " + JSON.stringify(allSlides));
Step 5: Use the useMakeCopilotActionable hook to set up an action called createNewPowerPointSlide with a description and an implementation function that updates the allSlides and currentSlideIndex state variables, as shown below.
useMakeCopilotActionable(
        {
          name: "createNewPowerPointSlide",
          description: "create slides for a powerpoint presentation. Call this function multiple times to present multiple slides.",
          argumentAnnotations: [
            {
              name: "slideTitle",
              type: "string",
              description: "The topic to display in the presentation slide. Use simple markdown to outline your speech, like a headline.",
              required: true,
            },
            {
              name: "content",
              type: "string",
              description: "The content to display in the presentation slide. Use simple markdown to outline your speech, like lists, paragraphs, etc.",
              required: true
            },
          ],
          implementation: async (newSlideTitle, newSlideContent) => {
            const newSlide: Slide = { title: newSlideTitle, content: newSlideContent};
            const updatedSlides = [...allSlides, newSlide];
            setAllSlides(updatedSlides);
            setCurrentSlideIndex(updatedSlides.length - 1);

          },
        },
        [],
      );
Step 6: Define a function called displayCurrentSlide that displays the current slide index in the front end.
// Display current slide
      const displayCurrentSlide = () => {
        const slide = allSlides[currentSlideIndex];
        return slide ? (<div
          className="h-screen flex flex-col justify-center items-center text-5xl text-white bg-cover bg-center bg-no-repeat p-10 text-center"
          style={{
              textShadow: "1px 1px 0 #000, -1px -1px 0 #000, 1px -1px 0 #000, -1px 1px 0 #000",
            }}
          >
          <Markdown className="markdown">{slide.title}</Markdown>
          <Markdown className="markdown">{slide.content}</Markdown>
        </div>
        ) : (
          <div className="h-screen flex flex-col justify-center items-center text-5xl text-white bg-cover bg-center bg-no-repeat p-10 text-center">
            No Slide To Display
          </div>
        );
      };
Step 7: Define a function called addSlide that holds a class called CopilotTask. The CopilotTask class defines functionality for adding a new slide.
// Add new slide function
  const addSlide = new CopilotTask({
    instructions: "create a new slide",
    actions: [
      {
        name: "newSlide",
        description: "Make a new slide related to the current topic.",
        argumentAnnotations: [
          {
            name: "title",
            type: "string",
            description: "The title to display in the presentation slide.",
            required: true,
          },
          {
            name: "content",
            type: "string",
            description: "The title to display in the presentation slide.",
            required: true,
          },
        ],
        implementation: async (newSlideTitle,newSlideContent,) => {
                const newSlide: Slide = {title: newSlideTitle,content: newSlideContent,};
                const updatedSlides = [...allSlides, newSlide];
                setAllSlides(updatedSlides);
                setCurrentSlideIndex(updatedSlides.length - 1);
              },
            },
          ],
        });
        const context = useCopilotContext();
        const [randomSlideTaskRunning, setRandomSlideTaskRunning] = useState(false);
Step 8: Define two functions called goBack and goForward. The goBack function defines functionality for navigating to the previous slide while the goForward function defines functionality for navigating to the next slide.
// Button click handlers for navigation
      const goBack = () => setCurrentSlideIndex((prev) => Math.max(0, prev - 1));
      const goForward = () => setCurrentSlideIndex((prev) => Math.min(allSlides.length - 1, prev + 1));
Step 9: Return a component that calls the displayCurrentSlide function and contains buttons that call the addSlide, goBack and goForward functions.
return (
        <div>
          {displayCurrentSlide()}
          <button
            disabled={randomSlideTaskRunning}
            className={`absolute bottom-12 left-0 mb-4 ml-4 bg-blue-500 text-white font-bold py-2 px-4 rounded
            ${randomSlideTaskRunning ? "opacity-50 cursor-not-allowed" : "hover:bg-blue-700"}`}
            onClick={async () => {
              try {
                setRandomSlideTaskRunning(true);
                await addSlide.run(context);
              } finally {
                setRandomSlideTaskRunning(false);
              }
            }}
          >
            {randomSlideTaskRunning ? "Loading slide..." : "Add Slide +"}
          </button>
          <button
          className={`absolute bottom-0 left-0 mb-4 ml-4 bg-blue-500 text-white font-bold py-2 px-4 rounded
          ${randomSlideTaskRunning ? "opacity-50 cursor-not-allowed" : "hover:bg-blue-700"}`}
          onClick={goBack}>Prev</button>
          <button
          className={`absolute bottom-0 left-20 mb-4 ml-4 bg-blue-500 text-white font-bold py-2 px-4 rounded
          ${randomSlideTaskRunning ? "opacity-50 cursor-not-allowed" : "hover:bg-blue-700"}`}
          onClick={goForward}>Next</button>
        </div>
      );
Step 10: In the Presentation folder, add the following code to the page.tsx file.
"use client";

import {
  CopilotKit
} from "@copilotkit/react-core";
import { CopilotSidebar } from "@copilotkit/react-ui";
import {Presentation} from "../components/present";
import "./styles.css";

let globalAudio: any = undefined;
let globalAudioEnabled = false;
const Demo = () => {
  return (
    <CopilotKit url="/api/copilotkit/openai">
      <CopilotSidebar
        defaultOpen={true}
        labels={{
          title: "Presentation Copilot",
          initial: "Hi you! 👋 I can give you a presentation on any topic.",
        }}
        clickOutsideToClose={false}
        onSubmitMessage={async (message) => {
          if (!globalAudioEnabled) {
            globalAudio.play();
            globalAudio.pause();
          }
          globalAudioEnabled = true;
        }}
      >
        <Presentation/>
      </CopilotSidebar>
    </CopilotKit>
  );
};
export default Demo;
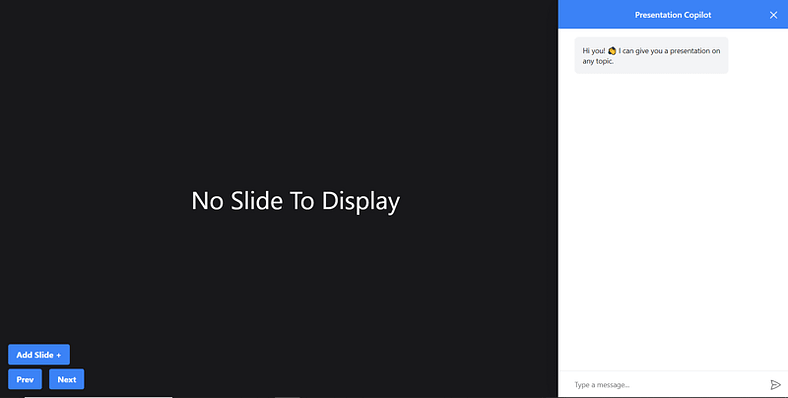
Step 11: Navigate to http://localhost:3000/, click the ‘Get Started’ button, and you will be redirected to the presentation page that is integrated with a chatbot, as shown below.
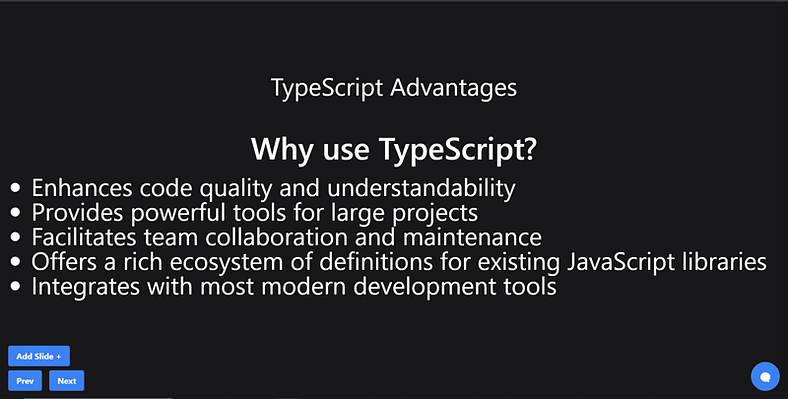
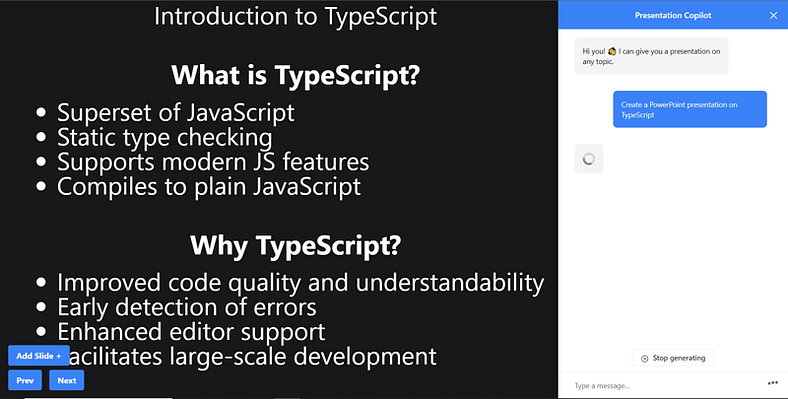
Step 12: Give the chatbot on the right side a prompt like “Create a PowerPoint presentation on TypeScript” The chatbot will start generating a response, and once it is done, it will display the generated PowerPoint slide on the left side of the page, as shown below.

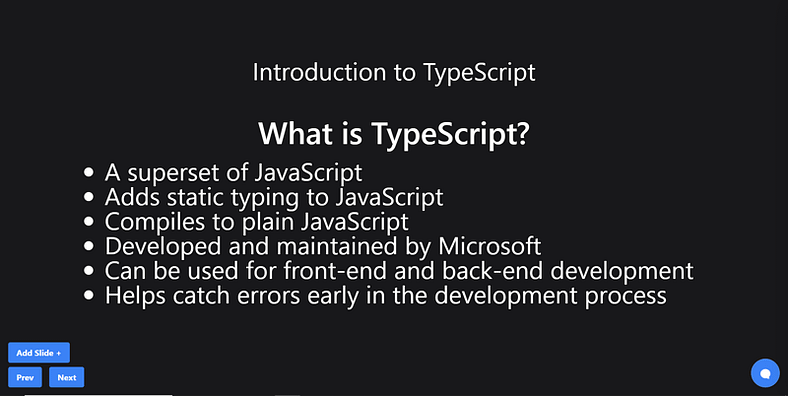
Step 13: Close the chatbot window and click the Add Slide + button to add a new slide to the PowerPoint presentation as shown below.
Step 14: Click the Prev button and you will navigate to the previous slide. If you click the Next button, you will navigate to the next slide.
Creating PowerPoint Slides Auto Speech Functionality
Step 1: In the present.tsx file, declare a variable called globalAudio, as shown below.
let globalAudio: any = undefined;
Step 2: Inside the Presentation component, declare a useEffect hook that initializes globalAudio with a new Audio object, as shown below.
useEffect(() => {
        if (!globalAudio) {
          globalAudio = new Audio();
        }
      }, []);
Step 3: Update the useMakeCopilotActionable hook to convert PowerPoint slides text into speech via an API, as shown below.
useMakeCopilotActionable(
        {
          name: "createNewPowerPointSlide",
          description: "create slides for a powerpoint presentation. Call this function multiple times to present multiple slides.",
          argumentAnnotations: [
            {
              name: "slideTitle",
              type: "string",
              description: "The topic to display in the presentation slide. Use simple markdown to outline your speech, like a headline.",
              required: true,
            },
            {
              name: "content",
              type: "string",
              description: "The content to display in the presentation slide. Use simple markdown to outline your speech, like lists, paragraphs, etc.",
              required: true
            },
{
                name: "speech",
                type: "string",
                description: "An informative speech about the current slide.",
                required: true,
            },
          ],
          implementation: async (newSlideTitle, newSlideContent, speech) => {
            const newSlide: Slide = { title: newSlideTitle, content: newSlideContent };
            const updatedSlides = [...allSlides, newSlide];
            setAllSlides(updatedSlides);
            setCurrentSlideIndex(updatedSlides.length - 1);
            const encodedText = encodeURIComponent(speech);
            const url = `/api/tts?text=${encodedText}`;
            globalAudio.src = url;
            await globalAudio.play();
            await new Promise<void>((resolve) => {
                globalAudio.onended = function () {
                resolve();
                };
            });
            await new Promise((resolve) => setTimeout(resolve, 500));
          },
        },
        [],
      );
Step 4: Update the addSlide function to convert new PowerPoint slides text into speech via an API, as shown below.
// Add new slide function
      const addSlide = new CopilotTask({
        instructions: "create a new slide",
        actions: [
          {
          name: "newSlide",
          description: "Make a new slide related to the current topic.",
          argumentAnnotations: [
            {
              name: "title",
              type: "string",
              description:"The title to display in the presentation slide.",
              required: true,
            },
            {
              name: "content",
              type: "string",
              description:"The title to display in the presentation slide.",
              required: true,
            },
{
                name: "speech",
                type: "string",
                description: "An informative speech about the current slide.",
                required: true,
            },
          ],
          implementation: async (newSlideTitle, newSlideContent, speech) => {
            const newSlide: Slide = { title: newSlideTitle, content: newSlideContent };
            const updatedSlides = [...allSlides, newSlide];
            setAllSlides(updatedSlides);
            setCurrentSlideIndex(updatedSlides.length - 1);
            const encodedText = encodeURIComponent(speech);
            const url = `/api/tts?text=${encodedText}`;
            globalAudio.src = url;
            await globalAudio.play();
            await new Promise<void>((resolve) => {
                globalAudio.onended = function () {
                resolve();
                };
            });
            await new Promise((resolve) => setTimeout(resolve, 500));
          },
        }
        ]
      });
Step 5: Give the chatbot the “Create a PowerPoint presentation on TypeScript” prompt again and you should hear a voice presenting the slides.
Creating Image Generation Functionality
Step 1: In the present.tsx file, add a new property called backgroundImage to type the interface Slide as shown below.
// Define slide interface
interface Slide {
  title: string;
  content: string;
  backgroundImage: string;
}
Step 2: Update the useMakeCopilotActionable hook to generate images for PowerPoint presentation slides.
useMakeCopilotActionable(
        {
          name: "createPowerPointSlides",
          description: "create slides for a powerpoint presentation. Call this function multiple times to present multiple slides.",
          argumentAnnotations: [
            {
              name: "slideTitle",
              type: "string",
              description: "The topic to display in the presentation slide. Use simple markdown to outline your speech, like a headline.",
              required: true,
            },
            {
              name: "content",
              type: "string",
              description: "The content to display in the presentation slide. Use simple markdown to outline your speech, like lists, paragraphs, etc.",
              required: true
            },
            {
                name: "backgroundImage",
                type: "string",
                description: "What to display in the background of the slide (i.e. 'dog' or 'house').",
                required: true,
              },
            {
                name: "speech",
                type: "string",
                description: "An informative speech about the current slide.",
                required: true,
            },
          ],
          implementation: async (newSlideTitle, newSlideContent, newSlideBackgroundImage, speech) => {
                      const newSlide: Slide = { title: newSlideTitle, content: newSlideContent, backgroundImage: newSlideBackgroundImage };
                      const updatedSlides = [...allSlides, newSlide];
                      setAllSlides(updatedSlides);
                      setCurrentSlideIndex(updatedSlides.length - 1);
                      const encodedText = encodeURIComponent(speech);
                      const url = `/api/tts?text=${encodedText}`;
                      globalAudio.src = url;
                      await globalAudio.play();
                      await new Promise<void>((resolve) => {
                          globalAudio.onended = function () {
                          resolve();
                          };
                      });
                      await new Promise((resolve) => setTimeout(resolve, 500));
                    },
                  },
                  [],
                );
Step 2: Update the addSlide function to generate images for new PowerPoint presentation slides.
Step 3: Update the Slide component in the slide.tsx file to generate an image via unsplash.com
// Add new slide function
      const addSlide = new CopilotTask({
        instructions: "create a new slide",
        functions: [
          {
          name: "newSlide",
          description: "Make a new slide related to the current topic.",
          argumentAnnotations: [
            {
              name: "title",
              type: "string",
              description:"The title to display in the presentation slide.",
              required: true,
            },
            {
              name: "content",
              type: "string",
              description:"The title to display in the presentation slide.",
              required: true,
            },
            {
                name: "backgroundImage",
                type: "string",
                description: "What to display in the background of the slide (i.e. 'dog' or 'house').",
                required: true,
              },
            {
                name: "speech",
                type: "string",
                description: "An informative speech about the current slide.",
                required: true,
            },
          ],

    implementation: async (newSlideTitle, newSlideContent, newSlideBackgroundImage, speech) => {
            const newSlide: Slide = { title: newSlideTitle, content: newSlideContent, backgroundImage: newSlideBackgroundImage };
            const updatedSlides = [...allSlides, newSlide];
            setAllSlides(updatedSlides);
            setCurrentSlideIndex(updatedSlides.length - 1);
            const encodedText = encodeURIComponent(speech);
            const url = `/api/tts?text=${encodedText}`;
            globalAudio.src = url;
            await globalAudio.play();
            await new Promise<void>((resolve) => {
                globalAudio.onended = function () {
                resolve();
                };
            });
            await new Promise((resolve) => setTimeout(resolve, 500));
          },
        }
        ]
      });
Step 3: Update the displayCurrentSlide function to add a background image to the PowerPoint presentation slides.
// Display current slide
      const displayCurrentSlide = () => {
        const slide = allSlides[currentSlideIndex];
        return slide ? (<div
          className="h-screen flex flex-col justify-center items-center text-5xl text-white bg-cover bg-center bg-no-repeat p-10 text-center"
          style={{
              backgroundImage: 'url("https://source.unsplash.com/featured/?' + encodeURIComponent(allSlides[currentSlideIndex].backgroundImage) + '")',
              textShadow: "1px 1px 0 #000, -1px -1px 0 #000, 1px -1px 0 #000, -1px 1px 0 #000",
            }}
          >
          <Markdown className="markdown">{slide.title}</Markdown>
          <Markdown className="markdown">{slide.content}</Markdown>
        </div>
        ) : (
          <div className="h-screen flex flex-col justify-center items-center text-5xl text-white bg-cover bg-center bg-no-repeat p-10 text-center">
            No Slide To Display
          </div>
        );
      };
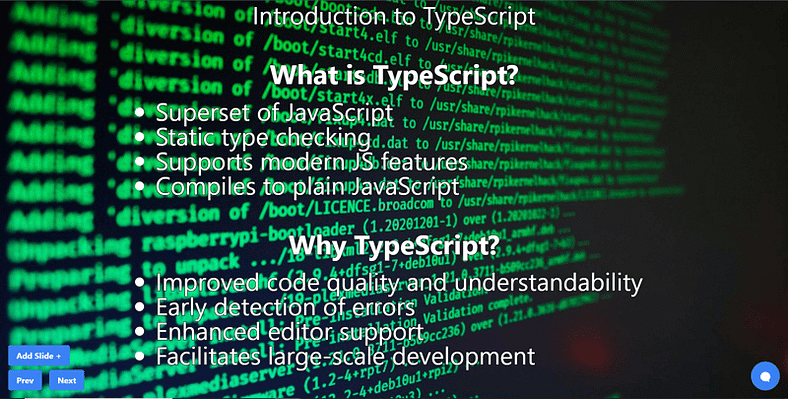
Step 4: Go to the web app and you should see a background image is added to the PowerPoint slide.
Conclusion
In conclusion, you can use CopilotKit to build in-app AI chatbots that can see the current app state and take action inside your app. The AI chatbot can talk to your app frontend, backend, and third-party services.
For the full source code: https://github.com/TheGreatBonnie/aipoweredpresentation
Don’t forget to… Star CopilotKit ⭐️